Easy Pine Cone Gnome Craft Ideas for Family Fun
Pine cone gnome kids craft ideas are the perfect way to inject some autumnal magic into your home and banish those rainy-day blues! Does your living room sometimes feel a little too… well, lived-in, with toys scattered and a general sense of delightful chaos? Imagine, instead, cozy corners adorned with these adorable, handcrafted gnomes, each one a unique testament to your family’s creativity. They’re surprisingly simple to make, costing just a few dollars for basic craft supplies, and you can whip up a whole troop in under an hour. In this article, we’ll explore how these charming creations can spark joy, inspire imaginative play that extends beyond just toys, and even provide a fun, low-key activity that complements the energy of gymnastics or backyard adventures. Get ready to discover how easy it is to transform humble pine cones into treasured family keepsakes.
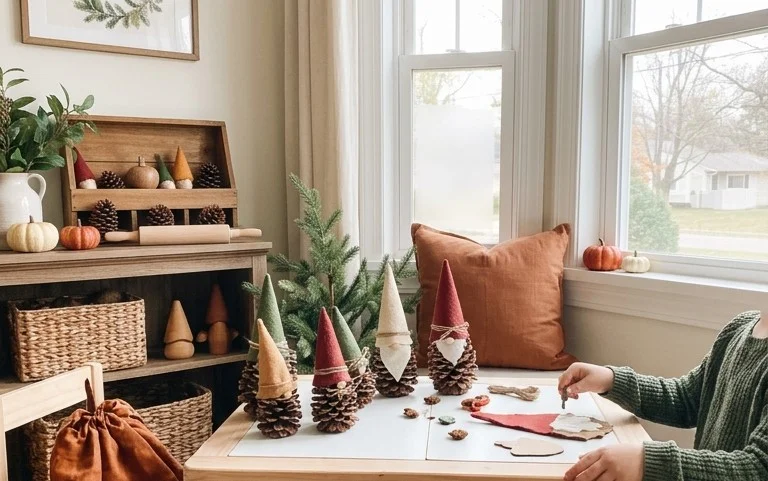
## Pine Cone Gnome Magic: Crafting Joy for the Whole Family
There’s a certain charm that a simple pine cone holds, doesn’t there? Its rugged texture, its natural silhouette – it’s practically begging to be transformed. And what better way to unleash its potential than by turning it into an adorable pine cone gnome? These little woodland sprites are more than just a craft; they’re a gateway to a world of imaginative play, a way to inject some festive fun into your home, and a delightful activity that the entire family, from tiny tots to seasoned crafters, can enjoy. Forget the pressure of perfect Pinterest projects; this is about embracing the process, celebrating individuality, and creating something truly special together.
### Why Pine Cone Gnomes?
You might be wondering, “Why pine cones?” Beyond their natural appeal, they offer a fantastic base for a craft that can be as simple or as elaborate as you desire. They’re readily available, often free if you take a stroll in a park, and they naturally lend themselves to a whimsical, outdoorsy aesthetic. These gnomes can be more than just decorative shelf-sitters; they can become characters in a story, props for backyard adventures, or even a fun way to inspire movement and imagination. Think of them as catalysts for:
* **Justifying Fun:** Sometimes, we just need a permission slip to be silly and creative. Making these gnomes is exactly that – an excuse to get hands-on, laugh, and enjoy each other’s company without the pressure of a formal lesson.
* **Gymnastics (of a sort!):** While we’re not literally tumbling, the process of gathering materials, finding the perfect pine cones, and delicately placing felt beards can feel like a mini-adventure. It involves fine motor skills, dexterity, and a good dose of patience!
* **Toys with Heart:** These aren’t mass-produced plastic. Each gnome is infused with your family’s love and effort. They become treasured playthings, sparking imaginative scenarios and encouraging storytelling.
* **Backyard Play Fuel:** Once created, these gnomes can easily transition from indoor decor to outdoor companions. Imagine them guarding a fairy garden, peeking out from behind a flower pot, or joining in on a game of make-believe in the garden.
### Gathering Your Gnome-Making Arsenal: What You Need and Rough Costs
The beauty of pine cone gnomes is their adaptability. You can go minimalist or maximalist, depending on your stash and budget. Here’s a breakdown of what you’ll likely need, with approximate costs. Remember, these are estimates, and you might already have many of these items!
**Essential Ingredients:**
* **Pine Cones:** Your primary building blocks! Aim for a variety of sizes and shapes, from about 3 to 6 inches tall. If you don’t have access to natural ones, you can often find craft-quality pine cones at local craft stores or online.
* *Cost:* Free (if collected) to $5-$10 for a bag of 10-15 craft pine cones.
* **Felt:** For hats, beards, and maybe some little boots. You can get a multi-pack of assorted colors.
* *Cost:* $5-$10 for a variety pack of felt sheets.
* **Craft Glue (PVA or Tacky Glue):** A good quality glue will be your best friend.
* *Cost:* $3-$5 for a medium bottle.
* **Scissors:** Sharp enough to cut felt cleanly.
* *Cost:* You likely already have this, but a decent pair might be around $10-$15.
* **Optional Embellishments:** These are where you can really let your creativity shine!
* **Pom-poms:** For nose tips or decorative accents. Small ones are great.
* *Cost:* $3-$6 for a bag of assorted pom-poms.
* **Yarn or Twine:** For beards, hair, or even to hang them.
* *Cost:* $2-$4 per skein of yarn/twine.
* **Small Wooden Beads or Buttons:** For noses.
* *Cost:* $2-$5 for a small pack.
* **Googly Eyes:** For a more playful look.
* *Cost:* $2-$4 for a pack.
* **Fabric Scraps:** For extra texture or detailing.
* *Cost:* Free if you have a scrap bin!
**Total Estimated Cost:** For a family of 4-6 gnomes, you’re looking at roughly $15-$40, depending on how many embellishments you choose and what you already own.
### Measuring the Magic: Planning Before You Start
Before we dive into the glue and felt frenzy, a little bit of planning goes a long way. This isn’t about rigid blueprints, but about understanding your materials and envisioning your finished gnomes.
1. **Pine Cone Selection:** Lay out your pine cones. Are some a bit wonky? Perfect! Those can be characters with personality. Group them by size if you’re aiming for a cohesive look, or embrace the delightful chaos of variety.
2. **Hat Design:** Think about the hats. Will they be tall and pointy, or a bit more slouchy? Measure the circumference of the top of your widest pine cone. This will give you a general idea of how wide your felt hat needs to be. For a standard cone, a circle with a diameter of about 2-3 inches, cut into a cone shape, will work.
3. **Beard Strategy:** How long and full do you want the beards to be? Hold up some yarn or felt to your pine cone. Consider the overall proportion. A beard that comes down to the base of the pine cone is a classic look.
4. **Nose Placement:** Where will the nose sit? Usually, it’s just below the hat, covering where the pine cone’s layers start to spread out.
**For Small Spaces or Rentals (No Drilling!):** The beauty of these gnomes is that they require no permanent alterations to your home. You can create display stands using small blocks of wood, decorative bowls, or even stacks of books. For hanging, use adhesive hooks designed for rentals (like Command strips) which remove cleanly.
### The Gnome-Making Journey: A Step-by-Step Adventure
Now for the fun part! Grab your supplies and gather your crew.
1. **Prepare Your Pine Cones:** Gently brush off any loose dirt or debris from your pine cones. If they feel a bit dusty, a quick rinse and thorough drying (outdoors in the sun is best!) can help.
2. **Craft the Hat:**
* Cut a semi-circle or a quarter-circle from your felt. The straight edge will form the brim.
* Roll the felt into a cone shape, overlapping the edges slightly.
* Apply a bead of craft glue along the overlapped seam and press firmly. Hold it for a few seconds until it starts to adhere. You can also add a small dab of glue to the top point to secure it.
* Let the hat dry completely.
3. **Attach the Hat:** Once the hat is dry, apply a generous ring of glue around the inside bottom edge of the felt hat. Carefully place it onto the top of the pine cone, pressing gently. You might want to have the hat sit slightly askew for a more whimsical look.
4. **Create the Beard:**
* **Felt Beard:** Cut a fluffy beard shape from your felt. It can be a simple rounded shape or have little jagged edges.
* **Yarn Beard:** Cut several lengths of yarn (about 3-5 inches each, depending on desired length). Bunch them together, tie them in the middle with a shorter piece of yarn, and then trim the ends to create a fluffy beard.
* Apply glue to the area below the hat where you want the beard to sit. Press your felt beard or yarn bundle firmly into the glue.
5. **Add the Nose:**
* Glue a small pom-pom or wooden bead onto the center of the beard, just below the hat.
* If you’re using googly eyes, now’s the time to glue them on above the nose!
6. **Finishing Touches (Optional):**
* **Hair:** If you want hair, you can glue small tufts of yarn around the sides of the hat, peeking out from underneath.
* **Boots:** Cut out small, boot-shaped pieces of felt and glue them to the base of the pine cone.
* **Decorations:** Add tiny pom-poms, buttons, or even a small felt flower to the hat for extra flair.
### Styling Your Gnome Village: Where to Place Them
Once your gnomes are dry and ready for their debut, consider where they’ll live.
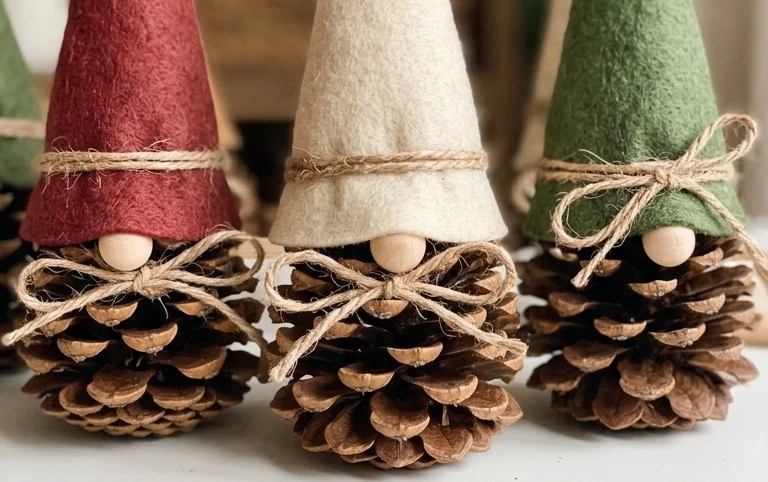
* **Colour Palette:** Think earthy tones – browns, greens, and warm reds for hats and boots. You can also introduce pops of brighter colours for a more festive feel. Complementary colours will make your gnomes stand out. For example, a red hat on a green felt beard would be striking.
* **Texture Play:** The natural texture of the pine cone is your base. Contrast it with the softness of felt, the fluffiness of yarn, or the smooth finish of wooden beads. Grouping gnomes of different textures together can create visual interest.
* **Strategic Placement:**
* **Shelving:** Arrange them on bookshelves, mantelpieces, or window sills. Vary their heights by placing them on small books or decorative risers.
* **Table Centerpieces:** A cluster of gnomes can make a charming centerpiece for a coffee table or dining table.
* **Entryway Accent:** A few gnomes by the front door can offer a warm and whimsical welcome.
* **Kid’s Play Area:** Place them in a dollhouse, a toy fort, or on a designated “gnome shelf” in their room.
* **Rental-Friendly Displays:** Use decorative bowls, baskets, or even trays to group your gnomes. This keeps them contained and adds to the decor.
### Taming the Gnome Chaos: Keeping it Tidy After Week One
The initial excitement of a new craft can sometimes lead to a bit of a mess. But keeping your gnomes and their display area tidy is easy with a few habits:
* **Designated Gnome Zone:** If possible, have a specific area where the gnomes live. This helps contain their presence and makes it easier to manage.
* **Weekly Dust-Off:** A quick dusting with a soft brush or a gentle vacuum cleaner attachment can keep them looking fresh.
* **”Home Base” for Accessories:** If your gnomes have any small accessories (like tiny felt mushrooms they might “carry”), have a small dish or basket nearby for them to live in when not in active play.
* **Encourage Responsible Play:** Remind children to put the gnomes back in their designated spot after playing. This is a great opportunity to reinforce tidiness habits.
* **Storage Solution:** If you need to put them away for a season, store them in a breathable fabric bag or a cardboard box to prevent dust accumulation.
### The Pitfalls of Gnome Failure: Common Mistakes to Avoid
Even with the simplest crafts, a few common missteps can derail the fun. Let’s talk about what *not* to do:
* **Over-Gluing:** While you need enough glue to secure things, using too much can create messy drips and oozes that are hard to clean up and detract from the finished look. Start with a moderate amount and add more if needed.
* **Rushing the Drying Process:** Patience is key! If you try to move or play with the gnomes before the glue is fully dry, parts can come loose, leading to frustration. Let them have their drying time.
* **Unrealistic Expectations:** These are handmade, whimsical creations. Don’t expect perfect symmetry or flawless execution, especially with children involved. The charm lies in their unique imperfections.
* **Not Enough Variety in Pine Cones:** While uniformity can be nice, a collection of gnomes made from very similar pine cones can feel a bit monotonous. Embrace the natural variations in size and shape.
* **Ignoring Kid Input:** This is a family craft! Allow children to make their own choices about colours, beard styles, and embellishments, even if it doesn’t align with your initial vision. Their creativity is what makes it special.
* **Forgetting the “Play” Aspect:** While they are decorative, remember they can also be toys. Don’t be afraid to let them be part of imaginative play, even if it means a stray yarn beard or a slightly tilted hat. That’s part of their charm and longevity.
Making pine cone gnomes is more than just a craft; it’s an investment in family time, creativity, and a touch of everyday magic. So, gather your pine cones, unleash your imaginations, and let the gnome-making adventures begin!
Conclusion
Bringing a touch of natural whimsy into your home with these pine cone gnome kids craft ideas isn’t just about a fun afternoon activity. It’s about creating little moments of joy and connection that make a real difference in your day-to-day life, transforming ordinary spaces into places of wonder. Imagine a small pine cone gnome perched on a bookshelf, a cheerful reminder of shared laughter and creativity.
Ready to start? The smallest possible first step is to simply gather a few pine cones from your backyard or a local park. For a different room, consider creating tiny pine cone gnome ornaments for your Christmas tree, or for a budget-friendly option, use pebbles or acorns instead of pine cones for a forest sprite collection. We invite you to explore more delightful craft ideas that will inspire your whole family!
