Easy Back to School Organization & Study Space Ideas
Plan for your school year starts with a home that supports learning. Do you ever find yourself staring at scattered papers, overflowing backpacks, and the general chaos that descends as homework, projects, and after-school activities flood your home? You’re not alone! I know I’ve been there, feeling that familiar pang of overwhelm as September approaches.
Imagine instead a calm, organized space where homework stations are ready, backpacks are neatly stowed, and supplies are easily accessible. A space that feels welcoming and functional, setting everyone up for success. This transformation doesn’t have to be a huge undertaking; with a few smart strategies, you can create this haven in just a weekend or two, for a surprisingly small investment in storage solutions.
In this article, I’ll walk you through how to create a clutter-free, functional environment. We’ll cover everything from designating smart study zones to taming the entryway beast, ensuring your home is your greatest ally, not another source of stress, as the school year kicks into gear.
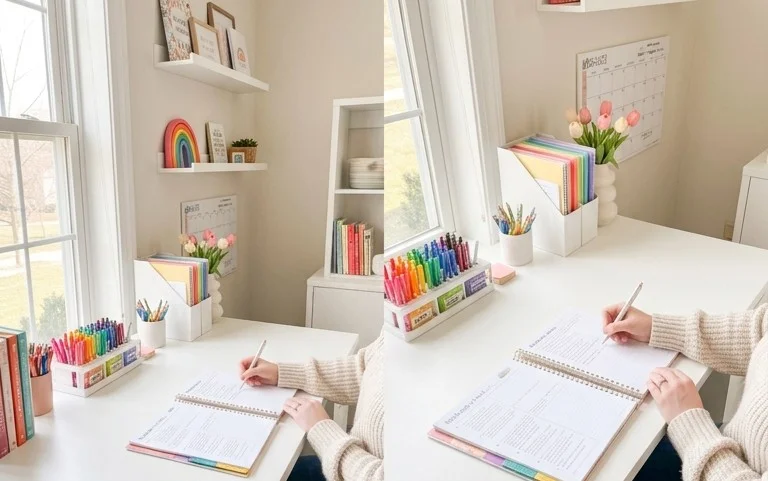
Plan for Your School Year: Creating an Organized and Stylish Study Space
As the summer days begin to shorten and the crisp scent of autumn whispers in the air, a familiar feeling often starts to creep in: the back-to-school buzz. Whether you’re a parent preparing for your child’s academic journey, a student heading back to university, or even an adult looking to finally tackle that online course, one thing is certain: a well-organized and inspiring study space can make all the difference. Today, I want to share my tried-and-true approach to creating a functional and beautiful learning environment, ensuring you hit the ground running this school year without the usual clutter and chaos.
What You’ll Need and Roughly What It Costs
Let’s get down to brass tacks. Before we even think about pretty styling, we need to understand the practicalities.
First, consider the **desk or workspace**. If you don’t have one, a simple writing desk can range from $80 to $300. For very small spaces, a wall-mounted desk or a fold-down option might be more suitable, costing around $50 to $150. An ergonomic chair is also crucial for those long study sessions. Budget around $100 to $400 for a decent one.
Next, **storage solutions**. This is where we can get creative.
* **Shelving**: Floating shelves are excellent for vertical storage. Expect to pay $20 to $60 per shelf, depending on size and material. If drilling is an issue, consider freestanding bookshelves or cube storage units, which can cost $50 to $200.
* **Drawers and Containers**: Desk organizers, drawer dividers, and decorative boxes are your best friends. A good set of drawer organizers might be $15 to $30. Stylish storage bins or baskets can range from $10 to $40 each.
* **Filing/Document Storage**: If you deal with a lot of papers, a simple file box or a stylish magazine holder can be around $10 to $25.
**Lighting**: Good lighting is non-negotiable. A desk lamp can cost $25 to $75. Consider a natural daylight bulb for reduced eye strain.
**Accessories**: These are the functional yet decorative bits. Think pen holders ($5-$15), memo boards or corkboards ($15-$40), and perhaps a small plant ($10-$25) to add a touch of life.
**Total Rough Estimate**: Depending on what you already own and the level of quality you’re aiming for, you could be looking at anywhere from $200 to $1000+. Don’t be discouraged by the higher end; many of these items can be found affordably during back-to-school sales.
Measuring and Planning Before You Start
This is the crucial, often skipped, step that saves so much hassle. Before you buy anything, grab your tape measure!
Measure your space.
* **Desk Area**: How much wall space do you have? What is the maximum width and depth your desk can be? Will it fit comfortably without obstructing walkways? For instance, if you have a nook that is 4 feet wide, you know your desk can’t be more than 48 inches.
* **Vertical Space**: Measure from your desk to the ceiling. This tells you how high shelves can go. If you have 6 feet (72 inches) of wall space above your desk, you can plan for shelves that extend almost that high.
* **Storage Footprint**: If you’re considering a bookshelf or cube unit, measure the floor space it will occupy. Make sure it won’t block doors, windows, or drawers from opening.
Once you have your measurements, sketch out your ideal setup. It doesn’t need to be an artistic masterpiece, just a rough floor plan. Where will the desk go? Where can storage units fit? How will you access everything? This visual guide will prevent impulse buys and ensure everything fits harmoniously. Think about workflow: where will you keep your most-used items? Where will less-frequently used materials reside?
A Clear Numbered Walkthrough of the Process
Now, let’s get down to business with a step-by-step guide.
1. **Clear the Space**: Completely empty the area you intend to use as your study zone. This gives you a blank canvas and allows you to see what you’re working with.
2. **Clean Up**: Dust, vacuum, and give the area a good wipe-down. A fresh start is always more motivating.
3. **Position Your Desk**: Based on your measurements and sketch, place your desk in its optimal location. Consider natural light sources – ideally, your desk should face a window or be perpendicular to it to avoid glare.
4. **Install or Place Shelving**: If using wall shelves, measure and mark your drill points carefully. If using freestanding units, position them adjacent to the desk or in a designated corner.
5. **Set Up Main Storage**: Place any drawer units, cube storage, or filing cabinets. Ensure they are stable and accessible.
6. **Organize Desk Essentials**: Use drawer organizers and desk caddies to group items like pens, pencils, highlighters, staplers, and paper clips.
7. **Declutter and Sort**: Go through all your existing school supplies. Discard anything broken, outdated, or no longer needed. Group similar items together.
8. **Populate Shelves and Units**: Start placing your organized supplies into their designated homes. Use decorative boxes and baskets to conceal less attractive items.
9. **Implement Task Lighting**: Position your desk lamp to illuminate your primary work area without creating shadows.
10. **Add Finishing Touches**: Introduce your memo board, plant, or any other decorative and functional accessories.
Adapting for a Small Space or Rental Restrictions
Living in a compact apartment or a rental property often means no drilling allowed. Fear not!
* **Vertical Storage with No Drilling**: Opt for tall, narrow bookshelves that lean against the wall (often secured with anti-tip straps, which can be applied without drilling). Over-the-door organizers are fantastic for notebooks, stationery, or even toiletries. Tension rod shelves can be installed in alcoves or between walls to create extra shelving. Command strips and adhesive hooks are your best friends for hanging lightweight items like memo boards or small shelves.
* **Multifunctional Furniture**: A desk with built-in drawers or shelves is a space-saver. A rolling cart can serve as mobile storage and can be tucked away when not in use.
* **Wall-Mounted Solutions**: Look for desks that fold down from the wall, or consider modular shelving systems that use tension poles. These can be surprisingly stable and offer a significant amount of storage.
* **Utilize Existing Structures**: If you have alcoves or awkward corners, consider custom-fit solutions using freestanding units or even DIY projects that don’t involve permanent fixtures.
For a small space, think about maximizing every inch. Can you put shelves above a doorway? Can a narrow console table serve as a desk in a hallway? Every opportunity for vertical or overlooked space counts.
Styling Notes: Color, Texture, and Placement
Now for the fun part – making it look good!
* **Color Palette**: Choose a calming and focused color scheme. Blues, greens, and neutrals are known for their ability to promote concentration. You can inject personality with pops of brighter colors through accessories like pen holders, a plant pot, or your memo board. For example, a light grey desk with a dusty blue chair and accents of mustard yellow in your storage bins creates a sophisticated yet stimulating look.
* **Texture**: Mix textures to add depth and interest. Smooth, sleek surfaces of a modern desk can be balanced with the woven texture of storage baskets or the soft feel of a comfortable chair cushion. A wooden desk offers natural warmth, which can be complemented by a metal desk lamp or ceramic organizers.
* **What to Put Where**:
* **Desk Surface**: Keep this as clear as possible. Only essentials should live here: your laptop, a lamp, a pen holder with a few frequently used pens, and perhaps a notepad.
* **Immediate Reach (Desk Drawers/Top Shelves)**: This is for items you use daily: current notebooks, textbooks, planners, highlighters, stapler.
* **Mid-Level Storage (Easy Access)**: Less frequently used but still important items: extra stationery, charging cables, reference books, stationery supplies.
* **Lower/Deeper Storage**: Archived schoolwork, old textbooks, bulk supplies, seasonal items.
* **Memo Board/Wall Space**: Inspirational quotes, important deadlines, upcoming events, visual aids.
The goal is to have everything visible yet organized, making it easy to find what you need and a pleasure to be in.
How to Keep It Tidy After Week One
The honeymoon phase of a perfectly organized space can fade fast. Here’s how to maintain it:
* **The 5-Minute Tidy**: At the end of each study session, dedicate just five minutes to putting things back where they belong. This is crucial for preventing small messes from snowballing.
* **”One In, One Out” Rule**: For new stationery or supplies, try to get rid of something similar that you no longer need.
* **Weekly Review**: Once a week, take 15 minutes to sort through papers, file documents, and restock anything that’s running low. This is also a good time to wipe down surfaces.
* **Designated “Incoming” Bin**: Have a specific spot for mail, handouts, and new papers that need processing. Schedule time to sort through this bin regularly.
* **Regular Decluttering**: Every month or two, do a more thorough decluttering session, revisiting your storage and getting rid of anything that has become obsolete.
The Mistakes That Make This Fail
Even with the best intentions, some common pitfalls can derail your organizational efforts.
* **Buying Too Much Stuff**: Resist the urge to buy every organizational product you see. Start with the basics and see what you truly need. Over-buying leads to more clutter.
* **Over-Complicating Systems**: If your system is too complex, you won’t maintain it. Simple, intuitive storage solutions are best.
* **Not Having a “Home” for Everything**: If an item doesn’t have a designated spot, it will inevitably end up in a pile.
* **Ignoring Aesthetics**: While function is key, a space that is purely utilitarian can feel uninspiring. Don’t be afraid to add personal touches and make it a place you *want* to spend time in.
* **Not Adapting the System**: Life changes, and so do our needs. If your current system isn’t working, don’t force it. Re-evaluate and adapt.
* **Procrastination on Tidying**: The biggest mistake is letting small messes accumulate. Daily or weekly small tidies are far more effective than infrequent, marathon cleaning sessions.
Creating an organized study space is an investment in your success this school year. It’s about setting yourself up for focus, efficiency, and a more enjoyable learning experience. So, grab your tape measure, your planning pad, and get ready to create a space that inspires you to learn and achieve your best!
Conclusion
Implementing a little thoughtful home decor and organization can truly transform your daily school year. Imagine less frantic mornings and more serene evenings, all thanks to a well-planned space. The difference it makes, from finding that lost homework to having a designated spot for everything, is immeasurable.
Ready to start? Your smallest possible first step today could be as simple as decluttering one drawer in your workspace. For a different room, perhaps tackle a single shelf in the kids’ playroom. On a tighter budget? Focus on repurposing existing containers before buying anything new.
We hope this inspires you to create a more harmonious and functional environment for a successful school year. There are always more ideas to explore to make your home a haven!